ShellCheck and shadowed case branches

As of the the latest commit, ShellCheck will try to detect shadowed case branches.

Here’s an adaptation from an unnamed script on GitHub:

case $1 in
    -h|--help)
        help
        exit 0
        ;;
    -h|--hub)
        hub=$2
        shift
        ;;
    *)
        die "Unknown option: $1"
        ;;
esac

The original case statement was significantly longer, so you’d be excused for not noticing the problem: -h is used for two different branches. Because of this, -h as a short option for --hub will not work.

If you run ShellCheck on this example now, you will get a pair of helpful warnings:

Line 4:
    -h|--help)
    ^-- SC2221: This pattern always overrides a later one.
 
Line 8:
    -h|--hub)
    ^-- SC2222: This pattern never matches because of a previous pattern.

Very simple and probably somewhat useful in certain cases, right? Well, it gets slightly more interesting.

Here is another example adapted from the wild:

case $1 in
    -h|--help|-?)
        usage
        exit
        ;;
    -v|--verbose)
        verbose=1
        ;;
    *)
        die "Unknown option: $1"
        ;;
esac

Did you spot the same problem? ShellCheck did:

Line 4:
    -h|--help|-?)
              ^-- SC2221: This pattern always overrides a later one.

Since an unescaped ? matches any character, it will match also match -v, so the short form of --verbose will not work.

Similarly, it recognizes two separate issues in this example:

    -*|--*) die "Invalid option: $1" ;;
    --) shift; break ;;

The end-of-option -- marker will never be recognized, and -*|--* is redundant because the first already covers the second.

These are all very simple cases, but this also works more generally. Here’s a fabricated music sorting script where the bug would be exceedingly hard to spot in a longer list of bands:

case "${filename,,}" in
  *"abba"*.mp3 ) rm "$filename" ;;
  *"black"*"sabbath"*.mp3 ) mv "$filename" "Music/Metal" ;;
esac

So how does it work?

There are very clever ways of determining whether one regular language is a superset of another by intersecting it with the complement of the other, and checking the result for satisfiability.

ShellCheck uses none of them.

I’ve written a regex inverter before, and that level of complexity was not something I wanted to introduce.

Instead, ShellCheck’s pattern intersection and superset supports only basic DOS style wildcard patterns: ?, * and literals. It just does a simple recursive match on the two patterns.

Let’s call the patterns A and B, and we wish to check if A is a superset of B, i.e. if A matches everything that B does.

We have two arbitrary shell patterns that we want to turn into a simplified form, while ensuring we don’t simplify away any details that will cause a false positive. ShellCheck does this in two ways:

It creates A in such a way that it’s guaranteed to match a (non-strict) subset of the actual glob. This just means giving up on any pattern that uses features we don’t explicitly recognize. $(cmd)foo@(ab|c) is rejected, while *foo* is allowed.

It then creates B to guarantee that it matches a (non-strict) superset of the actual glob. This is done by replacing anything we don’t support with a *. $(cmd)foo@(ab|c) just becomes *foo*.

Now we can just match the two patterns against each other with an inefficient but simple recursive matcher. Matching two patterns is slightly trickier than matching a pattern against a string, but it’s still a first year level CS exercise.

It just involves breaking down the patterns by prefix, and matching until you reach a trivial base case:

  • superset(“”, “”) = True
  • superset(“”, cY) = False
  • superset(cX, cY) = superset(X, Y)
  • superset(*X, *Y) = superset(*X, Y)

The actual code calls the simplified patterns “PseudoGlobs”, inhabited by PGAny ?, PGMany *, and PGChar c:

pseudoGlobIsSuperSetof :: [PseudoGlob] -> [PseudoGlob] -> Bool
pseudoGlobIsSuperSetof = matchable
  where
    matchable x@(xf:xs) y@(yf:ys) =
        case (xf, yf) of
            (PGMany, PGMany) -> matchable x ys
            (PGMany, _) -> matchable x ys || matchable xs y
            (_, PGMany) -> False
            (PGAny, _) -> matchable xs ys
            (_, PGAny) -> False
            (_, _) -> xf == yf && matchable xs ys

    matchable [] [] = True
    matchable (PGMany : rest) [] = matchable rest []
    matchable _ _ = False

That’s really all there is to it. ShellCheck just goes through each pattern, and flags the first pattern (if any) that it shadows. There’s also a pattern simplifier which rearranges c*?*?****d into c??*d to add some efficiency to obviously diseased patterns.

Future work could include supporting character sets/ranges since [yY] is at least occasionally used, but it’s rare to find any extglob to warrant full regex support.

Of course, 99% of the time, there are no duplicates. 99.9% of the time, you’d get the same result with simple string matches.

However, that 0.1% of cases where you get delightful insights like -? shadowing -v or Linux-3.1* shadowing Linux-3.12* makes it all worthwhile.

Compiling Haskell for Windows on Travis CI

or: How I finally came around and started appreciating Docker.

tl;dr: ShellCheck is now automatically compiled for Windows using Wine+GHC in Docker, without any need for additional Windows CI.

I don’t know what initially surprised me more: that people were building ShellCheck on Windows before and without WSL, or that it actually worked.

Unless you’re a fan of the language, chances are that if you run any Haskell software at all, it’s one of pandoc, xmonad, or shellcheck. Unlike GCC, Haskell build tools are not something you ever just happen to have lying around.

While Haskell is an amazing language, it doesn’t come cheap. At 550 MB, GHC, the Haskell Compiler, is the single largest package on my Debian system. On Windows, the Haskell Platform — GHC plus standard tools and libraries — weighs in at 4,200 MB.

If you need to build your own software from source, 4 GB of build dependencies unique to a single application is enough to make you reconsider. This is especially true on Windows where you can’t just close your eyes and hit “yes” in your package manager.

Thanks to the awesome individuals who package ShellCheck for various distros, most people have no idea. To them, ShellCheck is just a 5 MB download without external dependencies.

Starting today, this includes Windows users!

This is obviously great for them, but the more interesting story is how this happens.

There’s no parallel integration with yet another CI system like Appveyor, eating the cost of Windows licenses in the hopes of future business. There’s not been a rise of a much-needed de facto standard package manager, with generous individuals donating their time.

It’s also not me booting Windows at home to manually compile executables on every release, nor a series of patches trying to convince GHC to target Windows from GNU/Linux.

It’s a Docker container with GHC and Cabal running in Wine.

Ugly? Yes. Does it matter? No. The gory details are all hidden away by Docker.

Anyone, including Travis CI, can now easily and automatically compile ShellCheck (or any other Haskell project for that matter) for Windows in two lines, without a Windows license.

If you want ShellCheck binaries for Windows, they’re linked to on the ShellCheck github repo. If you want to take a look at the Docker image, there’s a repo for that too.

ShellCheck has had an official Docker build for quite a while, but it was contribution (thanks, Nikyle!). I never really had any feelings for Docker, one way or the other.

Consider me converted.

[ -z $var ] works unreasonably well

There is a subreddit /r/nononoyes for videos of things that look like they’ll go horribly wrong, but amazingly turn out ok.

[ -z $var ] would belong there.

It’s a bash statement that tries to check whether the variable is empty, but it’s missing quotes. Most of the time, when dealing with variables that can be empty, this is a disaster.

Consider its opposite, [ -n $var ], for checking whether the variable is non-empty. With the same quoting bug, it becomes completely unusable:

Input Expected [ -n $var ]
“” False True!
“foo” True True
“foo bar” True False!

These issues are due to a combination of word splitting and the fact that [ is not shell syntax but traditionally just an external binary with a funny name. See my previous post Why Bash is like that: Pseudo-syntax for more on that.

The evaluation of [ is defined in terms of the number of argument. The argument values have much less to do with it. Ignoring negation, here’s a simplified excerpt from POSIX test:

# Arguments Action Typical example
0 False [ ]
1 True if $1 is non-empty [ "$var" ]
2 Apply unary operator $1 to $2 [ -x "/bin/ls" ]
3 Apply binary operator $2 to $1 and $3 [ 1 -lt 2 ]

Now we can see why [ -n $var ] fails in two cases:

When the variable is empty and unquoted, it’s removed, and we pass 1 argument: the literal string “-n”. Since “-n” is not an empty string, it evaluates to true when it should be false.

When the variable contains foo bar and is unquoted, it’s split into two arguments, and so we pass 3: “-n”, “foo” and “bar”. Since “foo” is not a binary operator, it evaluates to false (with an error message) when it should be true.

Now let’s have a look at [ -z $var ]:

Input Expected [ -z $var ] Actual test
“” True: is empty True 1 arg: is “-z” non-empty
“foo” False: not empty False 2 args: apply -z to foo
“foo bar” False: not empty False (error) 3 args: apply “foo’ to -z and bar

It performs a completely wrong and unexpected action for both empty strings and multiple arguments. However, both cases fail in exactly the right way!

In other words, [ -z $var ] works way better than it has any possible business doing.

This is not to say you can skip quoting of course. For “foo bar”, [ -z $var ] in bash will return the correct exit code, but prints an ugly error in the process. For ” ” (a string with only spaces), it returns true when it should be false, because the argument is removed as if empty. Bash will also incorrectly pass var="foo -o x" because it ends up being a valid test through code injection.

The moral of the story? Same as always: quote, quote quote. Even when things appear to work.

ShellCheck is aware of this difference, and you can check the code used here online. [ -n $var ] gets an angry red message, while [ -z $var ] merely gets a generic green quoting warning.

Technically correct: floating point calculations in bc

Whenever someone asks how to do floating point math in a shell script, the answer is typically bc:

$  echo "scale=9; 22/7" | bc
3.142857142

However, this is technically wrong: bc does not support floating point at all! What you see above is arbitrary precision FIXED point arithmetic.

The user’s intention is obviously to do math with fractional numbers, regardless of the low level implementation, so the above is a good and pragmatic answer. However, technically correct is the best kind of correct, so let’s stop being helpful and start pedantically splitting hairs instead!

Fixed vs floating point

There are many important things that every programmer should know about floating point, but in one sentence, the larger they get, the less precise they are.

In fixed point you have a certain number of digits, and a decimal point fixed in place like on a tax form: 001234.56. No matter how small or large the number, you can always write down increments of 0.01, whether it’s 000000.01 or 999999.99.

Floating point, meanwhile, is basically scientific notation. If you have 1.23e-4 (0.000123), you can increment by a millionth to get 1.24e-4. However, if you have 1.23e4 (12300), you can’t add less than 100 unless you reserve more space for more digits.

We can see this effect in practice in any language that supports floating point, such as Haskell:

> truncate (16777216 - 1 :: Float)
16777215
> truncate (16777216 + 1 :: Float)
16777216

Subtracting 1 gives us the decremented number, but adding 1 had no effect with floating point math! bc, with its arbitrary precision fixed points, would instead correctly give us 16777217! This is clearly unacceptable!

Floating point in bc

The problem with the bc solution is, in other words, that the math is too correct. Floating point math always introduces and accumulates rounding errors in ways that are hard to predict. Fixed point doesn’t, and therefore we need to find a way to artificially introduce the same type of inaccuracies! We can do this by rounding a number to a N significant bits, where N = 24 for float and 52 for double. Here is some bc code for that:

scale=30

define trunc(x) {
  auto old, tmp
  old=scale; scale=0; tmp=x/1; scale=old
  return tmp
}
define fp(bits, x) {
  auto i
  if (x < 0) return -fp(bits, -x);
  if (x == 0) return 0;
  i=bits
  while (x < 1) { x*=2; i+=1; }
  while (x >= 2) { x/=2; i-=1; }
  return trunc(x * 2^bits + 0.5) / 2^(i)
}

define float(x) { return fp(24, x); }
define double(x) { return fp(52, x); }
define test(x) {
  print "Float:  ", float(x), "\n"
  print "Double: ", double(x), "\n"
}

With this file named fp, we can try it out:

$ bc -ql fp <<< "22/7"
3.142857142857142857142857142857

$ bc -ql fp <<< "float(22/7)"
3.142857193946838378906250000000

The first number is correct to 30 decimals. Yuck! However, with our floating point simulator applied, we get the desired floating point style errors after ~7 decimals!

Let's write a similar program for doing the same thing but with actual floating point, printing them out up to 30 decimals as well:

{-# LANGUAGE RankNTypes #-}
import Control.Monad
import Data.Number.CReal
import System.Environment

main = do
    input <- liftM head getArgs
    putStrLn . ("Float:  " ++) $ showNumber (read input :: Float)
    putStrLn . ("Double: " ++) $ showNumber (read input :: Double)
  where
    showNumber :: forall a. Real a => a -> String
    showNumber = showCReal 30 . realToFrac

Here's a comparison of the two:

$ bc -ql fp <<< "x=test(1000000001.3)"
Float:  1000000000.000000000000000000000000000000
Double: 1000000001.299999952316284179687500000000

$ ./fptest 1000000001.3
Float:  1000000000.0
Double: 1000000001.2999999523162841796875

Due to differences in rounding and/or off-by-one bugs, they're not always identical like here, but the error bars are similar.

Now we can finally start doing floating point math in bc!

Parameterized Color Cell Compression

I came across a quaint and adorable paper from SIGGRAPH’86: Two bit/pixel Full Color Encoding. It describes Color Cell Compression, an early ancestor of Adaptive Scalable Texture Compression which is all the rage these days.

Like ASTC, it offers a fixed 2 bits/pixel encoding for color images. However, the first of many d’awwws in this paper comes as early as the second line of the abstract, when it suggests that a fixed rate is useful not for the random access we covet for rendering today, but simply for doing local image updates!

The algorithm can compress a 640×480 image in just 11 seconds on a 3MHz VAX 11/750, and decompress it basically in real time. This means that it may allow full color video, unlike these impractical, newfangled transform based algorithms people are researching.

CCC actually works astonishingly well. Here’s our politically correct Lenna substitute:

mandrill

The left half of the image is 24bpp, while the right is is 2bpp. Really the only way to tell is in the eyes, and I’m sure there’s an interesting, evolutionary explanation for that.

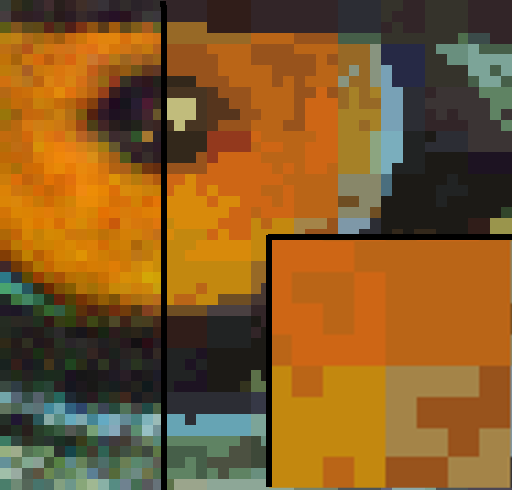
If we zoom in, we can get a sense of what’s going on:

mandrill_eye

The image is divided into 4×4 cells, and each cell is composed of only two different colors. In other words, the image is composed of 4×4 bitmaps with a two color palette, each chosen from an image-wide 8bit palette. A 4×4 bitmap would take up 16 bits, and two 8bit palette indices would take up 16 bits, for a total of 32 bits per 16 pixels — or 2 bits per pixel.

The pixels in each cell are divided into two groups based on luminosity, and each group gets its own color based on the average color in the group. One of the reasons this works really well, the author says, is because video is always filmed so that a change in chromaticity has an associated change in luminosity — otherwise on-screen features would be invisible to the folks at home who still have black&white TVs!

We now know enough to implement this lovely algorithm: find an 8bit palette covering the image, then for each cell of 4×4 pixels, divide the pixels into two groups based on whether their luminosity is over or under the cell average. Find the average color of each part, and find its closest match in the palette.

However, let’s experiment! Why limit ourselves to 4×4 cells with 2 colors each from a palette of 256? What would happen if we used 8×8 cells with 3 colors each from a palette of 512? That also comes out to around 2 bpp.

Parameterizing palette and cell size is easy, but how do we group pixels into k colors based on luminosity? Simple: instead of using the mean, we use k-means!

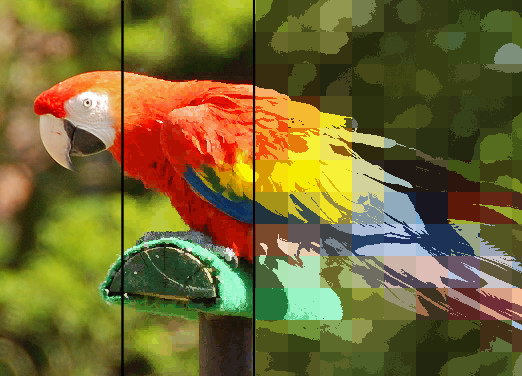
Here’s a colorful parrot in original truecolor on the left, CCC with 4×4 cells in the middle, and 32×32 cells (1.01 bpp) on the right. Popartsy!

ara3

Here’s what we get if we only allow eight colors per horizontal line. The color averaging effect is really pronounced:

ara4

And here’s 3 colors per 90×90 cell:
ara6

The best part about this paper is the discussion of applications. For 24fps video interlaced at 320×480, they say, you would need a transfer rate of 470 kb/s. Current microcomputers have a transfer rate of 625 kb/s, so this is well within the realm of possibility. Today’s standard 30 megabyte hard drives could therefore store around 60 seconds of animation!

Apart from the obvious benefits of digital video like no copy degradation and multiple resolutions, you can save space when panning a scene by simply transmitting the edge in the direction of the pan!

You can even use CCC for electronic shopping. Since the images are so small and decoding so simple, you can make cheap terminals in great quantities, transmit images from a central location and provide accompanying audio commentary via cable!

In addition to one-to-many applications, you can have one-to-one electronic, image based communication. In just one minute on a 9600bps phone connection, a graphic arts shop can transmit a 640×480 image to clients for approval and comment.

You can even do many-to-many teleconferencing! Imagine the ability to show the speaker’s face, or a drawing they wish to present to the group on simple consumer hardware!

Truly, the future is amazing.


Here’s the JuicyPixel based Haskell implementation I used. It doesn’t actually encode the image, it just simulates the degradation. Ironically, this version is slower than the authors’ original, even though the hardware is five or six orders of magnitude faster!

Apart from the parameterization, I added two other improvements: Firstly, instead of the naive RGB based average suggestion in the paper, it uses the YCrCb average. Second, instead of choosing the palette from the original image, it chooses it from the averages. This doesn’t matter much for colorful photograph, but gives better results for images lacking gradients.

Basics of a Bash action game

If you want to write an action game in bash, you need the ability to check for user input without actually waiting for it. While bash doesn’t let you poll the keyboard in a great way, it does let you wait for input for a miniscule amount of time with read -t 0.0001.

Here’s a snippet that demonstrates this by bouncing some text back and forth, and letting the user control position and color. It also sets (and unsets) the necessary terminal settings for this to look good:

#!/usr/bin/env bash

# Reset terminal on exit
trap 'tput cnorm; tput sgr0; clear' EXIT

# invisible cursor, no echo
tput civis
stty -echo

text="j/k to move, space to color"
max_x=$(($(tput cols) - ${#text}))
dir=1 x=1 y=$(($(tput lines)/2))
color=3

while sleep 0.05 # GNU specific!
do
    # move and change direction when hitting walls
    (( x == 0 || x == max_x )) && \
        ((dir *= -1))
    (( x += dir ))


    # read all the characters that have been buffered up
    while IFS= read -rs -t 0.0001 -n 1 key
    do
        [[ $key == j ]] && (( y++ ))
        [[ $key == k ]] && (( y-- ))
        [[ $key == " " ]] && color=$((color%7+1))
    done

    # batch up all terminal output for smoother action
    framebuffer=$(
        clear
        tput cup "$y" "$x"
        tput setaf "$color"
        printf "%s" "$text"
    )

    # dump to screen
    printf "%s" "$framebuffer"
done